You will only be able to upgrade your server integration, if your user role has permission to create servers, review our guide for more information on the different roles and permissions.
This guide requires your server to have been previously setup with our open source agent which is now known as our basic integration.
Before proceeding, you may also find it helpful to read our Advanced Integration Installation guide. This covers some of the more technical aspects about getting setup on ServerAuth and what our systems actually do on your server.
To begin upgrading your server, first click the Servers link in the header to load the list of servers and then click manage on the relevant server. If the server was setup with our basic integration and its operating system is one supported by our advanced integration, you will see the following box in the left side bar.

Click the Upgrade Server button and you will be taken to the upgrade process.
For step one, we need the initial connection information that ServerAuth needs to connect to your server. Here we need your servers IP address and the port SSH runs on, on your server (the default port is usually 22).
Note: If your server has a firewall that restricts inbound traffic, you may need to whitelist ServerAuth IP addresses. You can find these in our Advanced Integration Installation guide.
For the second step, we need a user with root/sudo access. If a user with that ability is already known to ServerAuth and has its SSH Keys synced via our agent, you can select the user from the drop down menu. If the user is not already known to ServerAuth, select "Enter a new SSH Username" and a text box will appear allowing you to enter the username.
If you entered a new username you will be presented with two options for providing ServerAuth access to that user. You can choose between SSH key authentication or Password authentication.
Our preferred method is to connect to your server via SSH Keys. When you select this option, you will be presented with a ServerAuth Team SSH Key in a screen like this:
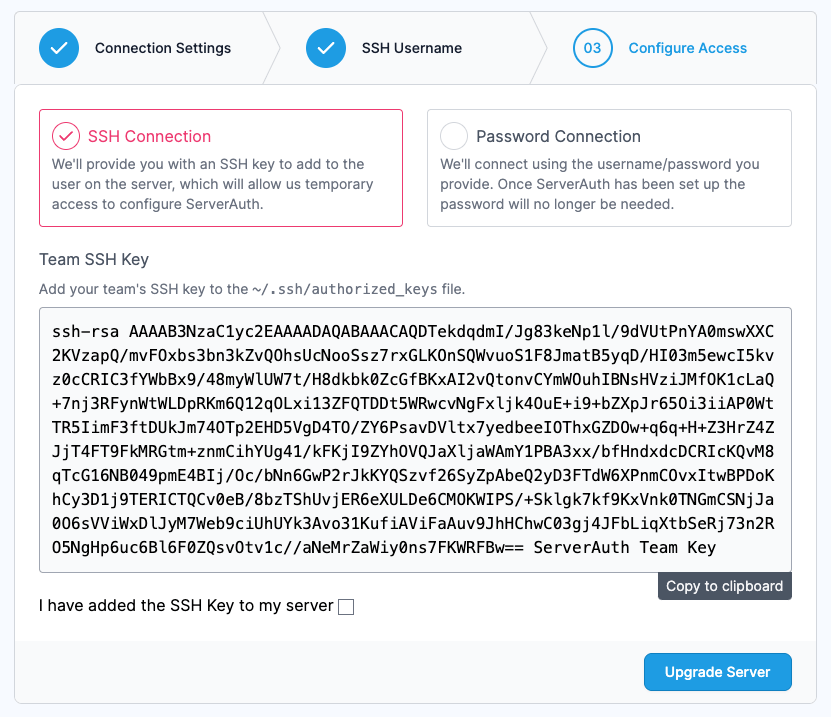
You need to copy this SSH key into the authorized_keys file for the user you specified in Step Two. You can read how to do that in our Advanced Integration Installation guide.
Once done, check the box to confirm you have added the key to the correct location and press upgrade server!
Alternatively, if you have chosen password authentication you will be presented with a simple text box to enter the password for the user specified in Step Two.
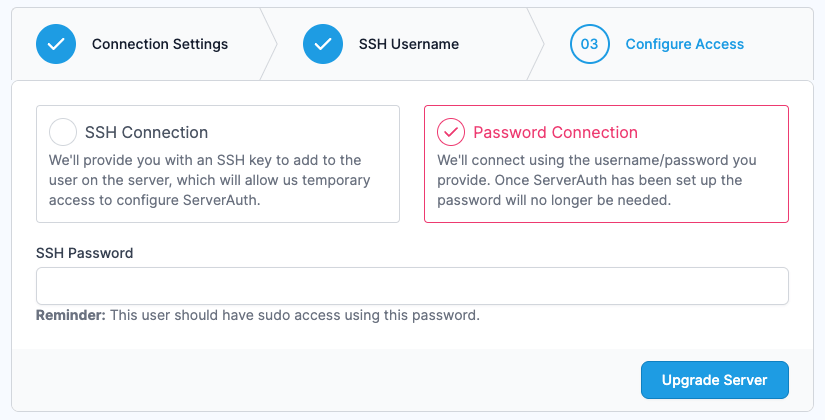
Note: We don't ever store this password, we use it once to connect in and upgrade your server to accept connections from our system, then we remove the password from our records.
Once entered, press the upgrade server button and our systems will start connecting to and upgrading it's connection to your server.
If you selected an existing username already known to ServerAuth, you will be presented with a preselected option for SSH Key Authentication.
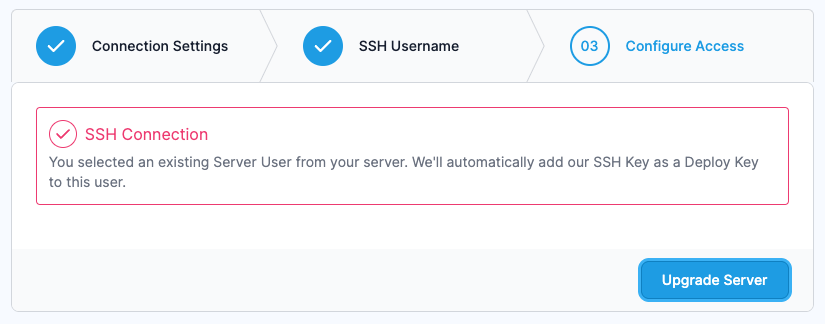
As described, ServerAuth will automatically add the SSH Key as a deploy key to the selected user.
There is nothing to click or confirm so simply press the upgrade server button when you are ready.
While ServerAuth is upgrading your server you will see the following screen.
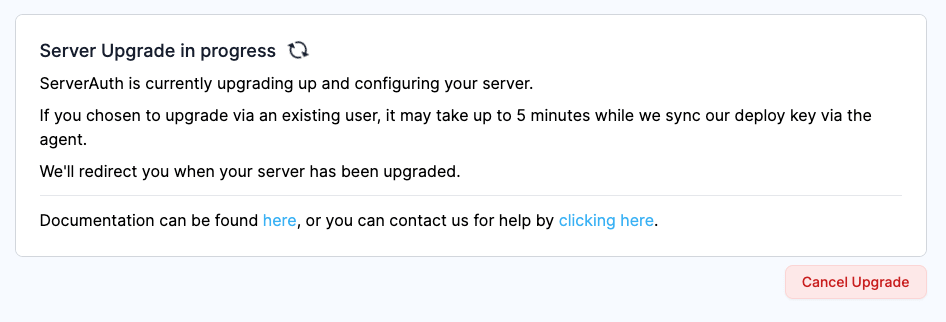
If there is an error during upgrade the page will show the error returned by our Server Management system, along with a server reference number which you can use when contacting us for support.
If upgrade is completed successfully, the page will automatically redirect you to the server overview page allowing you to then manage your server.
Note: As mentioned on the page, if you chose to upgrade via an existing user it could take up to 5 minutes to complete the upgrade. This is due to our upgrade systems needing to wait for the agent to sync the deploy key onto your server before it can begin the upgrade.
