SSH password authentication is convenient when setting up a new server, but leaving it enabled creates an unnecessary route into the system. Any public SSH service can receive automated login attempts, and the security of each account then depends on the strength and uniqueness of its password.
Switching to SSH keys removes password guessing from the login process and makes access easier to control across developers, contractors and automated deployments.
An SSH connection is encrypted, so the password is not sent across the network as plain text. The weakness lies in how the server decides whether to grant access.
With password authentication enabled, anyone who can reach the SSH service can attempt to log in. They need a valid username and password, but both can be targeted using automated tools.
Common risks include:
root, admin, ubuntu and deployRate limiting, firewalls and tools such as Fail2ban can reduce the number of unwanted login attempts. They remain useful security measures, but they do not remove password authentication itself.
Disabling password login means an attacker cannot gain SSH access simply by discovering or guessing an account password.
SSH key authentication uses a pair of cryptographic keys:
The public key does not need to be kept secret. It can safely be added to the server account that the user needs to access.
The private key must remain with the user. During login, the SSH client proves that it holds the matching private key without sending that key to the server.
A key can also be protected with a passphrase. This encrypts the private key file on the user’s computer, providing additional protection if the device or key file is stolen.
The passphrase is local to the key. It is not sent to the server.
Tools such as ssh-agent can hold an unlocked key in memory for the current session, allowing the user to enter the passphrase once rather than during every connection.
Disabling password authentication without testing key access first can lock you out of the server.
Before making any changes, confirm that:
sudo accessProvider console access is particularly important. It gives you another way to repair the SSH configuration if a mistake prevents remote login.
Do not close your existing SSH session until a new key-based session has connected successfully after the configuration change.
Run ssh-keygen on your own computer, not on the server:
ssh-keygen -t ed25519 -C "your-name@your-agency.com"
You will be asked where to save the key. The default location is usually suitable:
~/.ssh/id_ed25519
You will also be asked for a passphrase. Use a strong passphrase unless the key belongs to a non-interactive service that cannot supply one.
The command creates two files:
~/.ssh/id_ed25519
~/.ssh/id_ed25519.pub
The file without .pub is the private key. Do not email it, paste it into a support ticket, upload it to the server or share it with another team member.
The .pub file contains the public key and can be installed on servers.
For team members, include a useful comment when creating the key. A name, company email address or device identifier makes the key easier to recognise later.
The simplest method is ssh-copy-id:
ssh-copy-id -i ~/.ssh/id_ed25519.pub user@example.com
Replace user with the server account and example.com with the server hostname or IP address.
When SSH uses a custom port, include it with the -p option:
ssh-copy-id -i ~/.ssh/id_ed25519.pub -p 2222 user@example.com
This command normally uses the account password one final time to install the public key.
The key is added to:
~/.ssh/authorized_keys
Where ssh-copy-id is unavailable, log in to the server and create the required directory and file:
mkdir -p ~/.ssh
chmod 700 ~/.ssh
touch ~/.ssh/authorized_keys
chmod 600 ~/.ssh/authorized_keys
Open the file:
nano ~/.ssh/authorized_keys
Paste the complete contents of your .pub file onto a new line.
Each person should have a separate line containing their own public key.
For one server and one or two users, this is usually manageable. It becomes much harder when a team has access to several servers. Every new key must be copied to the right accounts, and every old key must be found and removed when access changes.
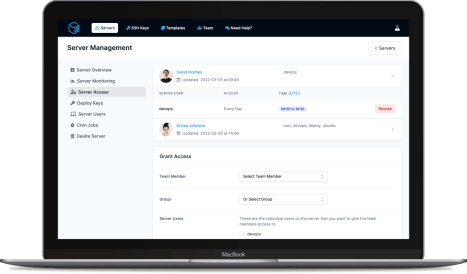
ServerAuth handles this by allowing each team member to store their own public keys while administrators choose which servers and system users they can access. ServerAuth then synchronises the relevant keys, avoiding the need to edit authorized_keys manually on every server.
Keep your existing SSH session open and start a second terminal window.
Force the new connection to use public key authentication:
ssh \
  -o PreferredAuthentications=publickey \
  -o PasswordAuthentication=no \
  user@example.com
Specify the key explicitly if the SSH client does not select it automatically:
ssh \
  -i ~/.ssh/id_ed25519 \
  -o PreferredAuthentications=publickey \
  -o PasswordAuthentication=no \
  user@example.com
After connecting, confirm that the account has the expected identity and sudo access:
whoami
sudo -v
Do not continue until this works.
A successful login without entering the server account password confirms that public key authentication is working. You may still be asked for the private key’s passphrase, which is expected.
OpenSSH commonly reads its main configuration from:
/etc/ssh/sshd_config
Many current systems also load configuration snippets from:
/etc/ssh/sshd_config.d/
Search for existing authentication settings before adding new ones:
sudo grep -RInE \
  '^[[:space:]]*(PasswordAuthentication|KbdInteractiveAuthentication|PubkeyAuthentication|AuthenticationMethods|Match|Include)[[:space:]]' \
  /etc/ssh/sshd_config /etc/ssh/sshd_config.d 2>/dev/null
Pay attention to:
PasswordAuthentication valuesKbdInteractiveAuthentication valuesMatch blocks that apply different rules to particular users or addressesChecking these files first avoids adding a setting that appears correct but never becomes the effective value.
On a system that includes /etc/ssh/sshd_config.d/*.conf, create a dedicated configuration file:
sudo nano /etc/ssh/sshd_config.d/00-disable-password-auth.conf
Add:
PubkeyAuthentication yes
PasswordAuthentication no
KbdInteractiveAuthentication no
The three settings have separate purposes.
PubkeyAuthentication yes
Allows users to authenticate using SSH keys.
PasswordAuthentication no
Disables the standard OpenSSH password authentication method.
KbdInteractiveAuthentication no
Disables keyboard-interactive authentication, which can also present a password-style prompt through PAM or another authentication system.
On a system that does not include the configuration snippet directory, edit the main configuration instead:
sudo nano /etc/ssh/sshd_config
Add or update the same three directives:
PubkeyAuthentication yes
PasswordAuthentication no
KbdInteractiveAuthentication no
Place global settings before the first Match block. A setting added below a Match directive may only apply to connections covered by that block.
Always validate the SSH configuration before applying it:
sudo sshd -t
No output means the syntax check passed.
Any error must be corrected before reloading SSH. A broken configuration can prevent the service from accepting new connections.
You can also inspect the effective authentication settings:
sudo sshd -T | grep -E \
  '^(pubkeyauthentication|passwordauthentication|kbdinteractiveauthentication|permitrootlogin) '
The output should include:
pubkeyauthentication yes
passwordauthentication no
kbdinteractiveauthentication no
When the server uses Match blocks, check the configuration for a particular connection:
sudo sshd -T \
  -C user=deploy,host=example.com,addr=203.0.113.10 \
  | grep -E '^(pubkeyauthentication|passwordauthentication|kbdinteractiveauthentication) '
Replace the username, hostname and source address with values relevant to the connection being tested.
On Ubuntu and Debian systems, use:
sudo systemctl reload ssh
On Rocky Linux, AlmaLinux, Fedora and other RHEL-family systems, use:
sudo systemctl reload sshd
A reload applies the updated configuration without unnecessarily terminating existing sessions.
Keep the original terminal connected while completing the remaining checks.
Open another terminal and connect normally:
ssh user@example.com
Confirm that the key-based login still works.
You can then test that password authentication has been rejected by disabling public key authentication in the client:
ssh \
  -o PubkeyAuthentication=no \
  -o PreferredAuthentications=password,keyboard-interactive \
  user@example.com
The connection should fail with a message similar to:
Permission denied
Only close your original SSH session after both tests have produced the expected result.
Password authentication and root login are controlled separately.
A server can reject passwords while still allowing the root account to log in using a key. The PermitRootLogin setting supports several values:
PermitRootLogin yes
PermitRootLogin prohibit-password
PermitRootLogin forced-commands-only
PermitRootLogin no
For most web servers, it is sensible to create an individual administrative user with sudo access and disable direct root login:
PermitRootLogin no
This gives administrators their own login identity and avoids routine work being performed through a shared root account.
Some backup tools, provisioning systems and older deployment processes rely on key-based root access. Review those processes before changing this setting.
PasswordAuthentication no sometimes appears to do nothingA password prompt after changing the configuration does not always mean the directive has been ignored.
Several causes are common.
Some PAM configurations can request an account password through keyboard-interactive authentication.
Set:
KbdInteractiveAuthentication no
Then check the effective configuration with sshd -T.
A file in /etc/ssh/sshd_config.d/ may define the setting before the main configuration is read.
Search every loaded SSH configuration file and check the effective result:
sudo sshd -T | grep passwordauthentication
Match block changes the settingA Match User, Match Group or Match Address section can apply different authentication rules to particular connections.
Use sshd -T -C to inspect the settings for the affected user and source address.
Saving the configuration file does not update a running SSH service.
Reload the appropriate ssh or sshd service after validating the configuration.
Check the hostname, IP address and port carefully. DNS records, bastion hosts and load-balanced environments can make it easy to edit one server while testing another.
Verbose client output can help identify the connection and authentication methods being attempted:
ssh -vv user@example.com
SSH keys improve access control when every person has their own key.
A shared private key creates many of the same operational problems as a shared password. You cannot easily tell who used it, and removing one person’s access requires replacing the key everywhere it has been installed.
A sensible team policy should require:
authorized_keys fileA developer using a desktop and laptop can have a different key for each device. If the laptop is lost, its key can be removed without affecting access from the desktop.
Deployment systems should use dedicated deployment keys. Do not copy a developer’s personal private key into a CI platform or deployment service.
Where possible, restrict automated keys to the account and purpose they require. Keep these keys separate from credentials that provide general administrative access.
Manual SSH key management becomes harder as the number of servers and team members grows.
Adding a developer may require copying their public key to several server accounts. When they leave, every copy must be found and removed. A missed key can leave access active long after it should have ended.
ServerAuth provides a central way to manage this process.
Each team member can add their own public SSH keys to their ServerAuth account. Administrators can then choose which servers and server users that person is permitted to access.
This is useful when different people need different levels of access. For example:
ServerAuth synchronises key changes with the relevant servers, reducing the risk of old keys being left behind.
Password authentication should still be disabled on the server. ServerAuth manages which public keys are installed, while OpenSSH continues to handle the actual authentication.
Key authentication removes password guessing from the server login process, but private keys still need to be handled carefully.
Protect human keys with passphrases and use ssh-agent or the operating system’s secure key storage to make them convenient to use.
Do not:
For environments with stricter security requirements, OpenSSH also supports hardware-backed keys. These require possession of a compatible hardware device before a login signature can be produced.
Key authentication should sit alongside operating system updates, firewall controls, sensible sudo permissions, monitoring and regular access reviews.
When key access fails after password authentication has been disabled, use the cloud provider’s console, serial console or recovery environment.
The recovery process will usually involve one of the following:
~/.sshWhen re-enabling password access for recovery, do it through the provider console and disable it again as soon as key access has been repaired.
Check the SSH service logs for useful details.
On Ubuntu and Debian:
sudo journalctl -u ssh
On RHEL-family systems:
sudo journalctl -u sshd
Authentication logs may also be available in:
/var/log/auth.log
or:
/var/log/secure
The exact location depends on the distribution and logging configuration.
Password authentication is easy to understand, but it leaves every reachable account exposed to password-based login attempts.
SSH keys provide stronger access control, particularly when each developer or contractor uses an individual, passphrase-protected key. They also allow one person’s access to be removed without changing credentials for the rest of the team.
The safe order matters:
For a single server, managing the keys manually may be enough. Once several people and servers are involved, ServerAuth can take care of distributing and removing those keys while keeping access tied to individual team members.
You still benefit from standard OpenSSH key authentication, without needing to update every server by hand whenever someone joins, leaves or changes projects.
ServerAuth provides a whole host of management tools, from controlling who can access your server, to managing your website deployments. And with an ever-growing suite of tools you'll always be one step ahead!
Start for free